Welcome to my Article series introducing you to bitbucket vs Git and GitHub. In this Article, I am going to cover the difference between Git and GitHub.Future videos in the series will contain walk throughs and demos, but this Article is largely conceptual. So, what is the difference between Git and GitHub? Git is a system for version control primarily used by programmers as well as multiple users who write source code. It runs/Executes at the command line(Terminal or CMD) on your local machine.
What is the difference between Git and GitHub?
It allows you to keep track of your files and modifications to those files in something called a repository (or”repo”). For example, here’s a repository on my local machine. These are the files and folders being tracked. And here are the last 5 changes to the repo. You can use it alone, or you can use it with a team of people who are working on the same project.
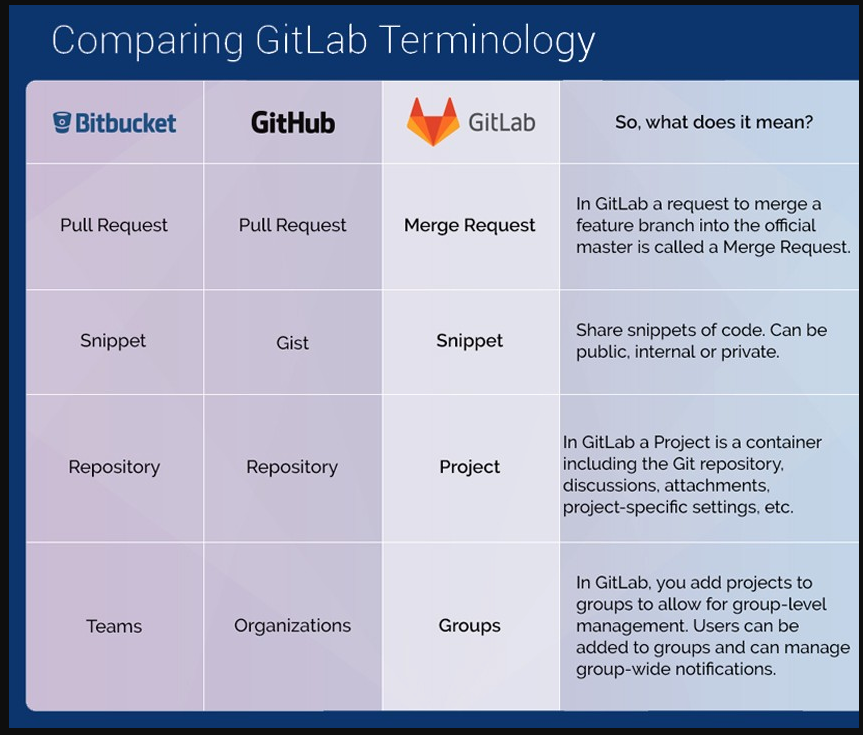
It’s useful in a team environment because everyone can work independently on those files, merge their changes together,and there is a permanent record of who made which change. So how does GitHub relate to Git? GitHub is a website that allows you to upload your Git repositories online. Why would you do this?Well, it provides a backup of your files. Second, it gives you a visual interface for navigating your repos. Third, it gives other people a way to navigate your repos. And finally,it makes repo collaboration easy. All of these concepts will become much more clear in the upcoming videos. One final note is that Git does not require the use of GitHub. Anyway, it’s very common to use GitHub if you are using gitlab vs github vs bitbucket.
Today, I am setting up our remote repository Ace I will also consider at a step by step instruction comparison between three popular Git hosting web sites So let’s get started bitbucket vs github…
Well what is a Repository?
According to Google, a repository is “a central location in which data is stored and managed” The standard process is to have a local copy of the repository on your machine with a remote copy on one of the Git Hosting Sites This is not mandatory Ace, but it’s generally a good idea to have a central place for syncing changes A remote repository can be public or private Ace A public repository can be copied by anyone, whereas a private repo can only be copied by specified users Let’s setup a local repository.
You can use an existing project or create a new one Ace Open Source Tree In order for us to execute Git commands on our local repository and for us to sync changes with our remote repository, I shall need to update our credentials Ace Click “Tools” then “Options” Type in an alias to the “Full Name” text input Ace For the “Email address” input, type the one you’re going to use when I register to our repository’s host website.
why use bitbucket vs github?
These are the details Git will use to communicate with our remote repository Ace If these credentials are wrong, the repositories won’t sync with each other To create a repository,
click the “Clone/New” Icon in the top left corner, and then Click the “Create New Repository” tab Put the path to your project in the “Destination Path” text input Ace
and click “Create” Your Repository will now be added to the bookmarks in the left menu Ace If you’ve converted an existing project to a Git repository, you’ll have to “commit” all the files in that project Ace.
I’ll discuss this process in greater detail in later videos For now, follow on as I make our first commit Click the “File Status” tab and click the checkbox beside “Unstaged files” This will move all your files into the “Staged Area” Ace More on this in later videos Type a message into the “Commit message” text box Ace after that you can simply click “Commit” means all the Activity controls saves then Click the maintain “Log/History” tab as well as you should display your first saved based commit.
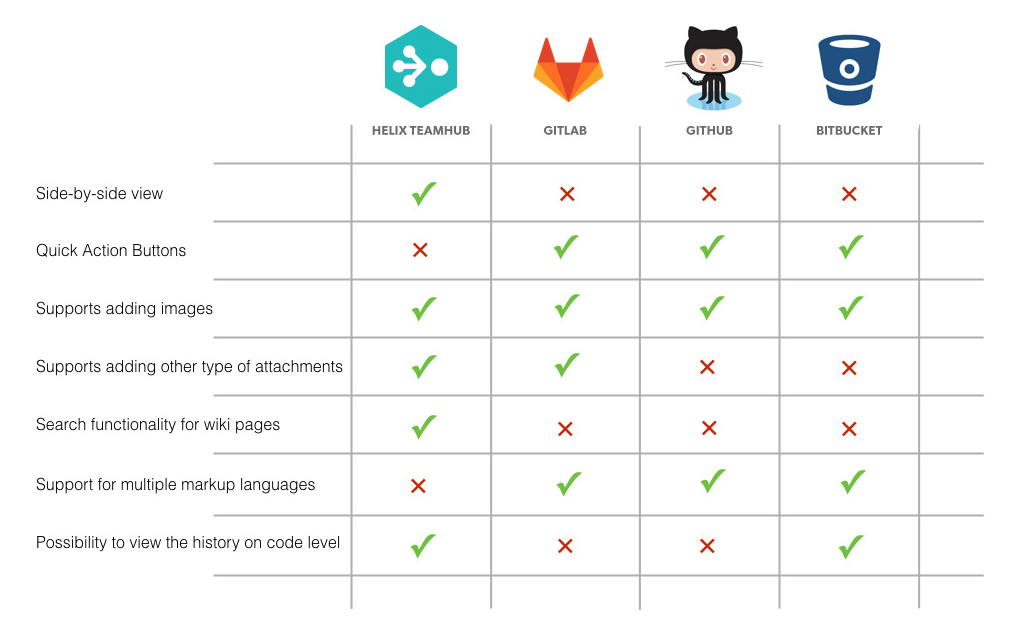
Now I will setup our remote host I’d advise you not to use Dropbox as a remote host Ace, as it tends to corrupt your repositories But if you fancy an experiment, be my guest There are several hosting sites to choose from Ace The three I will briefly look at are “Github”, “Gitlab” and “Bitbucket” There is a great comparison between these three on the website “Slant”, the link is in the description Ace It lays out all the pros and cons of each service and allows their users to agree or disagree with the statements.
I’m not going to go into all the features of each service Ace, but feel free to check them out yourself Github is the most popular of the three Ace But only public repositories are free Both Bitbucket and Gitlab offer unlimited private repositories for free Anyway, with Bitbucket, you’re allowed only 5 users on each repo Bitbucket also has a size limit for it’s repositories Ace, with a soft limit of 1 gig, and a Hard Limit of 2 gigs Gitlab doesn’t have such limits Ace, and that’s why it’s my preferred hosting site Feel free to use a different hosting site Ace, the setup should be similar with any of them Head to the Gitlab website and click login or “Sign In” .
Here you can sign in with your account or create a new one Ace Don’t forget to use the same email address as the one I entered into Source Tree Also make sure you activate the account via email or you won’t be able to sync Once you’ve logged in, you’ll be brought to a list of all your projects, After that simply you can Click “New Project” Ace and then Enter in the your fresh project’s name as well as include a project a description for it Select the repository’s type.
Ace Usually you’ll want to keep your repository private unless you’re planning to share it with the general public Once you’re done, click “Create project” Make sure there are no spaces in the project’s name Ace, as this will cause an error Now that our project has been setup on Gitlab, I need to sync our local repository to it Copy the remote repository’s URL Head back into Source Tree and click the “Settings” icon in the top right corner.
Here I can add our remote repository’s path Click “Add” and give your remote a name Ace The standard name for a remote repo on Source Tree is “origin” Ace, but feel free to call it “Gitlab” or something else if you’d prefer Paste the remote’s URL into the “URL/Path” text input and click “OK” We’re ready to sync with the remote Ace Click on the “Push” icon in the top menu I’ll discuss the “Push” process in a later article Clicking the checkbox beside the “master” local branch will change the Remote branch to match it The default branch in Git is the called the “master” branch Ace, but I will discuss this in depth in future videos Click “OK” when you’re done and this will begin the push If all goes well, there should be an “origin/master” tag beside your first commit Just to be sure it worked, I can head back to the Gitlab site and look at our project.
what is the main drawback to using github vs bitbucket to host your own personal projects
Here I can see it’s updated our remote and our first commit has been pushed to it Now I’ll show you how to “Clone” a repository Ace A “Clone” is essentially the same as copying the repository, however the remotes of the repository are not copied To “Clone” a repository, I need it’s “URL” or “Path” Copy your remote’s URL and head back to Source Tree Click the “Clone/New” icon in the top menu and click the “Clone Repository” tab Paste your remote’s URL into the “Source Path” text input and select a “Destination Path” for your repository When you’re finished Ace, click “Clone” If all goes well, our repository will be cloned, and should have the same first commit as the one I pushed earlier Let’s remove a repository from Source Tree To do this, right click on the repository’s bookmark in the left side menu Click “Delete” Ace You can choose to remove only the bookmark or to remove the full repo on disk Deleting the repository will leave the Git folder behind Ace, so remember to delete it as well With our local and remote repositories setup, I am now ready to use Git And that’s it…