
laravel shopping cart : In this article i will sample demonstrate how to create a shopping cart with php using laravel framework. i will be using laravel 5.6 but you can also use any other latest version.
laravel shopping cart
laravel shopping cart – here you can learn to step by step Creating a Shopping Cart With Laravel. This is best article of the Laravel E-Commerce Application Development step by step also i will start implementing the laravel shopping cart step by step without Install Shopping Cart Package.
Step 1: Installation
In your local development path type this command to install laravel 5.6.
composer create-project laravel/laravel shopping-basket "5.6.*" --prefer-dist
And then step by step successful installation be sure that there is a created a“.env” file in the root path of the web application. If not then take a copy of “.env.example” after that this file simply rename it to “.env” then in type this command in the terminal.
php artisan key:generate
Now laravel shopping cart – laravel successfully installed and you can be sure by visiting http://your-domain-name.com/shopping-basket/public/.
Step 2: Preparing Database
DB_CONNECTION=mysql DB_HOST=127.0.0.1 DB_PORT=3306 DB_DATABASE=shopping_basket DB_USERNAME=DB_PASSWORD=
Next we will be using laravel migration to create tables so ype this command in terminal.
php artisan make:model Item -m
The above command will make a Item model and -m for migration.
Now go to database > migrations and open up the migration we just created for items table.
increments('id');
            $table->timestamps();
        });
    }
    /**
     * Reverse the migrations.
     *
     * @return void
     */
    public function down()
    {
        Schema::dropIfExists('items');
    }
}
I will be adding some more fields to the up() function therefor add this php laravel source code after $table->increments(‘id’)
$table->string("name", 255)->nullable();
$table->text("information")->nullable();
$table->string("item_img", 255)->nullable();
$table->decimal("price", 6, 2);
Now migrate your tables by this command:
php artisan migrate
Now let’s create a Seeder to populate our items table with some data to work with. Run this command to generate a seeder.
php artisan make:seed ItemsSeeder
Go to database>seeds>ItemsSeeder. Then inside run() function add this code.
DB::table('items')->insert([
'name' => 'Apple Galaxy S9',
'information' => 'Laptops : Shop for laptops & mini laptops online at best prices in India at Amazon.in. Get Free 1 or 2 day delivery with Amazon Prime',
'item_img' => 'https://i.ebayimg.com/00/s/ODY0WDgwMA==/z/9S4AAOSwMZRanqb7/$_35.JPG?set_id=89040003C1',
'price' => 7878.88
]);
DB::table('items')->insert([
'name' => 'Apple iPhone X',
'information' => 'Laptop Prices in India - Buy Laptops Online at Lowest Prices on Flipkart.com Choose from a wide range of Laptops from best brands like HP, Dell, Lenovo, Acer',
'item_img' => 'https://i.ebayimg.com/00/s/MTYwMFg5OTU=/z/9UAAAOSwFyhaFXZJ/$_35.JPG?set_id=89040003C1',
'price' => 7778.00
]);
DB::table('items')->insert([
'name' => 'Dell Pixel 2 XL',
'information' => 'Get the best Laptops Online from Reliance Digital. Shop from top Laptop Brands like Apple, HP, Lenovo, Microsoft, Dell, iBall & more.',
'item_img' => 'https://i.ebayimg.com/00/s/MTYwMFg4MzA=/z/G2YAAOSwUJlZ4yQd/$_35.JPG?set_id=89040003C1',
'price' => 7587.00
]);
DB::table('items')->insert([
'name' => 'Asser V10 H900',
'information' => 'A laptop, laptop computer, or notebook computer is a small, portable personal computer (PC) with a screen and alphanumeric keyboard. ',
'item_img' => 'https://i.ebayimg.com/00/s/NjQxWDQyNA==/z/VDoAAOSwgk1XF2oo/$_35.JPG?set_id=89040003C1',
'price' => 7852.99
]);
DB::table('items')->insert([
'name' => 'Iphone Elate',
'information' => 'Planning for Online Mobile Shopping? Visit us now to explore mobile phones including mobile prices, reviews, comparisons, features, videos, accessories',
'item_img' => 'https://ssli.ebayimg.com/images/g/aJ0AAOSw7zlaldY2/s-l640.jpg',
'price' => 5288.00
]);
DB::table('items')->insert([
'name' => 'HTC One M10',
'information' => 'Buy latest Mobile Phones at best prices online at Croma.Com. Choose smartphones from brands like Apple, Samsung, MI, OnePlus and get best.',
'item_img' => 'https://i.ebayimg.com/images/g/u-kAAOSw9p9aXNyf/s-l500.jpg',
'price' => 7845.99
]);
Now run this command to seed your data.
php artisan db:seed --class=ItemsSeeder
Don’t Miss : PHP Shopping Cart
Step 3: Controller & Views
Let’s create a controller for our items and basket called “ItemsController”.
php artisan make:controller ItemsController
Now these actions in the above controller as shown:
public function index() { return view('items'); } public function basket() { return view('basket'); } public function addToCart($id) { }In the above code we created two actions for our items and basket pages and one action for add to basket.
Next we will create three views with dummy data:
- layout.blade.php: this is the main layout view.
- items.blade.php: this is the view that will display our items.
- basket.blade.php: this is the basket view.
In the layout.blade.php simple copy and paste this source code.
@yield('title')
3
Total: $2,978.24

Sony DSC-RX100M..
$250.22 Quantity:01
Vivo DSC-RX100M..
$500.40 Quantity:01
Lenovo DSC-RX100M..
$445.78 Quantity:01
@yield('content')
@yield('scripts')
As shown in the above code we have included bootstrap and jquery and the main style.css file and in the template header we displayed the basket icon along with sample dummy data.
items.blade.php
@extends('layout')
@section('title', 'Items')
@section('content')
Item name
Lorem ipsum dolor sit amet, consectetur adipisicing elit. Facere, soluta, eligendi doloribus sunt minus amet sit debitis repellat. Consectetur, culpa itaque odio similique suscipit
Price: 567.7$
Item name
Lorem ipsum dolor sit amet, consectetur adipisicing elit. Facere, soluta, eligendi doloribus sunt minus amet sit debitis repellat. Consectetur, culpa itaque odio similique suscipit
Price: 567.7$
Item name
Lorem ipsum dolor sit amet, consectetur adipisicing elit. Facere, soluta, eligendi doloribus sunt minus amet sit debitis repellat. Consectetur, culpa itaque odio similique suscipit
Price: 567.7$
Item name
Lorem ipsum dolor sit amet, consectetur adipisicing elit. Facere, soluta, eligendi doloribus sunt minus amet sit debitis repellat. Consectetur, culpa itaque odio similique suscipit
Price: 567.7$
@endsection
basket.blade.php
@extends('layout')
@section('title', 'Cart')
@section('content')
| Item | Price | Quantity | Subtotal | |
|---|---|---|---|---|
Item 1Quis aute iure reprehenderit in voluptate velit esse cillum dolore eu fugiat nulla pariatur. Lorem ipsum dolor sit amet. |
$1.99 | 1.99 | ||
| Total 1.99 | ||||
| Continue Shopping | Total $1.99 | |||
style.css
.main-section{
    background-color: #F8F8F8;
}
.dropdown{
    float:right;
    padding-right: 30px;
}
.btn{
    border:0px;
    margin:10px 0px;
    box-shadow:none !important;
}
.dropdown .dropdown-menu{
    padding:20px;
    top:30px !important;
    width:350px !important;
    left:-110px !important;
    box-shadow:0px 5px 30px black;
}
.total-header-section{
    border-bottom:1px solid #d2d2d2;
}
.total-section p{
    margin-bottom:20px;
}
.basket-info{
    padding:15px 0px;
}
.basket-info-img img{
    width:100%;
    height:100%;
    padding-left:15px;
}
.basket-info-item p{
    margin:0px;
    color:#000;
    font-weight:500;
}
.basket-info .price{
    font-size:12px;
    margin-right:10px;
    font-weight:500;
}
.basket-info .count{
    color:#C2C2DC;
}
.checkout{
    border-top:1px solid #d2d2d2;
    padding-top: 15px;
}
.checkout .btn-primary{
    border-radius:50px;
    height:50px;
}
.dropdown-menu:before{
    content: " ";
    position:absolute;
    top:-20px;
    right:50px;
    border:10px solid transparent;
    border-bottom-color:#fff;
}
.thumbnail {
    position: relative;
    padding: 0px;
    margin-bottom: 20px;
}
.thumbnail img {
    width: 100%;
}
.thumbnail .caption{
    margin: 7px;
}
.page {
    margin-top: 50px;
}
.btn-holder{
    text-align: center;
}
.table>tbody>tr>td, .table>tfoot>tr>td{
    vertical-align: middle;
}
@media screen and (max-width: 600px) {
    table#basket tbody td .form-control{
        width:20%;
        display: inline !important;
    }
    .actions .btn{
        width:36%;
        margin:1.5em 0;
    }
    .actions .btn-info{
        float:left;
    }
    .actions .btn-danger{
        float:right;
    }
    table#basket thead { display: none; }
    table#basket tbody td { display: block; padding: .6rem; min-width:320px;}
    table#basket tbody tr td:first-child { background: #333; color: #fff; }
    table#basket tbody td:before {
        content: attr(data-th); font-weight: bold;
        display: inline-block; width: 8rem;
    }
    table#basket tfoot td{display:block; }
    table#basket tfoot td .btn{display:block;}
}
Don't Miss : Vue Shopping Cart
Step 4: Routes for laravel shopping cart
At this point go to routes > web.php and add the following routes:
Now visit http://your-domain-name.com/shopping-basket/public/ and http://your-domain-name.com/shopping-basket/public/basket you will see our items and basket page respectively.
Displaying Items
Go to ItemsController.php in the index function add the below source code
public function index() { $items = Item::all(); return view('items', compact('items')); }Here i fetch all items as well as sent them to the items view.
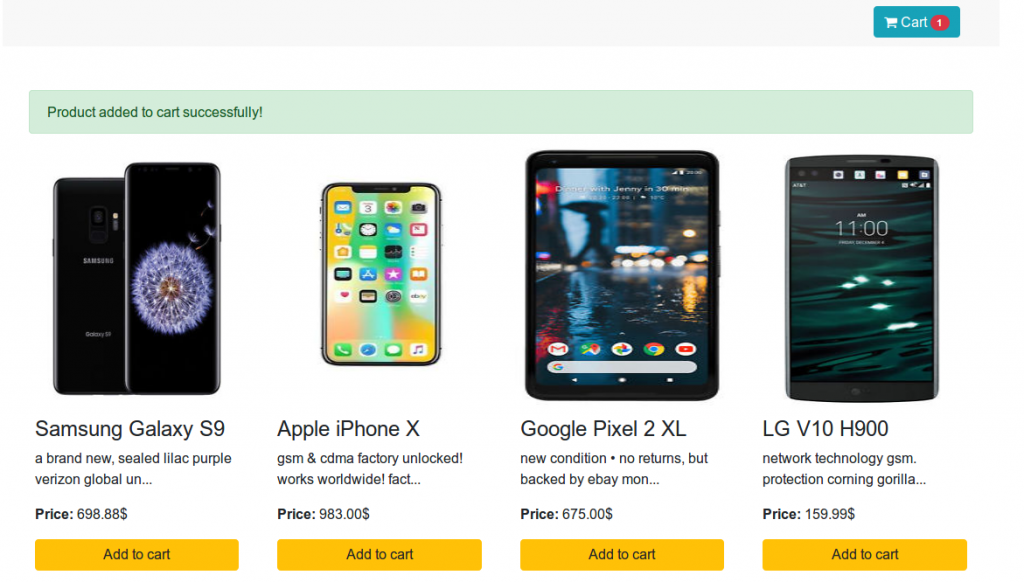
for "laravel shopping cart" - Now go to resources > views > items.blade.php as well as replace the sample data with the below source code
@extends('layout') @section('title', 'Items') @section('content')@endsection@foreach($items as $item)@endforeach
{{ $item->name }}
{{ str_limit(strtolower($item->information), 50) }}
Price: {{ $item->price }}$
Great work now you can see the actual items by going to http://your-domain-name.com/shopping-basket/public/
Step 5: Processing the basket
Now this is time to add logic for when user clicks on add to basket button. I will do this in the addToCart function in ItemsController.php and i will store the basket item using laravel session.
public function addToCart($id) { $item = Item::find($id); if(!$item) { abort(404); } $basket = session()->get('basket'); // if basket is empty then this the first item if(!$basket) { $basket = [ $id => [ "name" => $item->name, "item_qty" => 1, "price" => $item->price, "item_img" => $item->item_img ] ]; session()->put('basket', $basket); return redirect()->back()->with('success', 'Item added to basket successfully!'); } // if basket not empty then check if this item exist then increment item_qty if(isset($basket[$id])) { $basket[$id]['item_qty']++; session()->put('basket', $basket); return redirect()->back()->with('success', 'Item added to basket successfully!'); } // if item not exist in basket then add to basket with item_qty = 1 $basket[$id] = [ "name" => $item->name, "item_qty" => 1, "price" => $item->price, "item_img" => $item->item_img ]; session()->put('basket', $basket); return redirect()->back()->with('success', 'Item added to basket successfully!'); }In the above source code first i fetch the item and checked if it exist or not then i check if there is a basket exist in the session.
If basket is empty then i treated the item as the first item and insert it along with item_qty and price.
If basket not empty i checked if the item already exist and increment its item_qty.
Step 6: Displaying the basket contents
At this point i have a basket with items let’s display it in the basket view.
Go to resources > views > basket.blade.php and update the view with below source code:
@extends('layout') @section('title', 'Cart') @section('content')
| Item | Price | Quantity | Subtotal | |
|---|---|---|---|---|
{{ $infos['name'] }} |
${{ $infos['price'] }} | ${{ $infos['price'] * $infos['item_qty'] }} | ||
| Total {{ $total }} | ||||
| Continue Shopping | Total ${{ $total }} | |||
And also update the main layout view page layout.blade.php
@yield('title') - laravel shopping cart
{{ count((array) session('basket')) }}
@foreach((array) session('basket') as $id => $infos)
@endforeach
Total: $ {{ $total }}
@if(session('basket'))
@foreach(session('basket') as $id => $infos)

{{ $infos['name'] }}
${{ $infos['price'] }} Quantity:{{ $infos['item_qty'] }}
@endforeach
@endif
@yield('content')
@yield('scripts')
Step 7: Updating & removing from the basket
Last step to remove/delete or update an item in the basket we will create two actions in the ItemsController as follows:
public function update(Request $request)
    {
        if($request->id and $request->item_qty)
        {
            $basket = session()->get('basket');
            $basket[$request->id]["item_qty"] = $request->item_qty;
            session()->put('basket', $basket);
            session()->flash('success', 'Your Cart updated successfully');
        }
    }
    public function remove(Request $request)
    {
        if($request->id) {
            $basket = session()->get('basket');
            if(isset($basket[$request->id])) {
                unset($basket[$request->id]);
                session()->put('basket', $basket);
            }
            session()->flash('success', 'Item removed successfully');
        }
    }
Let’s make main 2 other web routes
Route::patch('update-basket', 'ItemsController@update');
Route::delete('remove-from-basket', 'ItemsController@remove');
Now go to resources > views > basket.blade.php and add this full source code at the bottom
@section('scripts')
@endsection
As shown above I added main 2 types of the listeners for buttons update as well as remove and for each button just send jquery ajax request to update and remove items.
I hope you get an idea about laravel shopping cart.
I would like to have feedback on my infinityknow.com.
Your valuable feedback, question, or comments about this article are always welcome.
If you enjoyed and liked this post, don’t forget to share.