WP Rocket WordPress Plugin Full Setup There are millions of websites all over the world, of which more than 60 percent of the website is built on WordPress only.
If we talk about the plugin for the performance of a blog or website built on WordPress, then the wp Rocket plugin comes at the top number three. With the help of this plugin, the loading speed of our blog or website is fast.
The biggest thing is that no matter how well we install the best plugin for the performance of our site, but if we do not setup it well, then we do not get even 20% of the benefit of that plugin.
In this post, we will learn to do WP Rocket WordPress Plugin Full Setup, which settings to enable and disable, we will try to understand this thing with a screen shot and I am sure that as soon as you do the full setup of this plugin in a good way. Similarly, the performance of your site will be much better than before.
Download and Install WP Rocket
WP Rocket Premium Plugin v3.9.2 Free Download [GPL]
Keep in mind that wp Rocket is not a free plugin, it is a paid service, for this we pay about $ 50 for a year, if you have not bought this plugin yet and you want to take full advantage of it, then look here to buy it . Buy WP Rocket
As soon as you click on the link of Buy wp Rocket, you will go to the site of WP Rocket, now click on the button of Get Wp Rocket Now here.
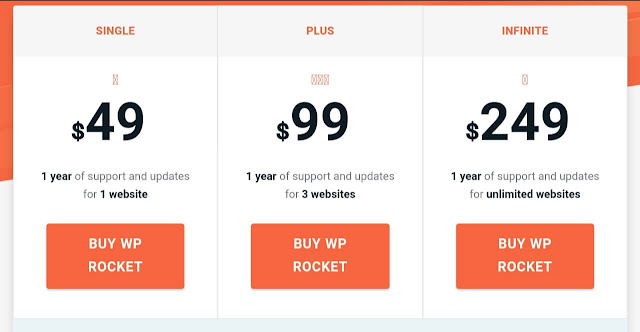
Now if you have a website, then you take their single plan, this plan is now available for $ 49, but if you go through the link given above, then you will get 25% in discount i.e. for $ 36 only.
WP Rocket Post Updation details
| File Name | WP Rocket |
| Latest Version | v3.9.2 |
| File Type | 100% Clean GPL |
| Post Published on | 22-04-2020 |
| Post Updated On | 27-08-2021 |
To buy a single plan, click on the Buy wp Rocket button, and then after entering your name email and your country name, choose the payment method and click on the place order button, your purchase will be completed.
After the purchase is complete, login to your WP Rocket account and then click on the Download WP Rocket button at the bottom left side and then the zip file of this plugin will be downloaded to your system.
Now we will upload this zip file by going to the plugin section of our WordPress blog and clicking on Add NEW.
Uploading WP Rocket Zip File to WordPress
Now to upload the zip file of WP Rocket to the WordPress blog, first of all, login to your WordPress admin panel, then move the mouse cursor over the plugins in the left side and click on the button of Add New.
Now click on Upload Plugin button on top right side and then click on Choose File button below and then select zip file of wp rocket in your system and then click on open button.
Now the wp Rocket plugin has been uploaded to WordPress, now click on the install now button, and then click on the Activate button.
So far, we have activated the WP Rocket WordPress Plugin by purchasing it and uploading it to our WordPress blog, now we will do the full setup of this plugin, only then our site performance and loading speed will be of high quality.
WP Rocket WordPress Plugin Full Setup
To do WP Rocket WordPress Plugin Full Setup, login to your WordPress admin panel, then hover your mouse over Settings in the left side and then click on wp Rocket.
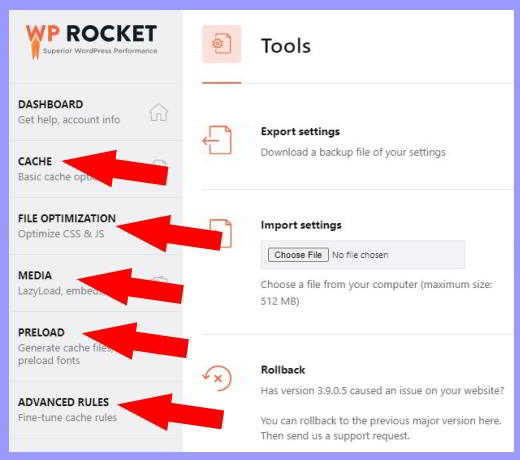
Now the Settings of WP Rocket will open in front of you, now you will complete the setup by clicking on the Cache, File Optimization, Media, Preload, Advance Rules etc.
option in these settings. (see picture below)
Note :
Here we will enable you to enable different types of settings of WP Rocket one by one, but keep in mind that along with enabling the setting, keep checking your site if after enabling any of the settings, there is something in your site. If the error appears, then you should disable that setting back.
Cache
First of all click on the Cache tab at the bottom of the Dashboard and then tick mark by clicking on the small box of both enable caching for mobile device and separate cache files for mobile device as shown in the picture below and then save at the bottom Save these settings by clicking on the change button.
If you have the same theme for mobile and desktop on your site, then do not enable this option with separate cache files for mobile device.
If users on your site are able to view the content by logging in, then you can tick mark the third option enable caching for logged in WordPress users to enable this option as well.
File Optimization
After Cache, click on the second option File Optimization tab below and then its settings will open in the right side. Now here to enable the options mentioned below, click on the small box and tick mark it.
- combine CSS files
- delay JavaScript execution
- load JavaScript deferred
- minify CSS files
- minify JavaScript files
- optimize CSS delivery
- remove unused CSS
To enable the above-mentioned seven settings, tick the box and then save these settings by clicking on the Save Changes button below.
Media
Next is the settings Media, for this click on the tab of Media and then its settings will open in the right side. Now here to enable the options mentioned below, click on the box and tick mark it.
- enable for images
- enable for iframes and video
- replace YouTube iframe with preview image (Note- Enable this option only if you embed YouTube videos in your posts)
- add missing image dimensions
To enable the four options mentioned above, after ticking the small box, save this setting by clicking on the Save Changes button at the bottom.
Preload
Next option click on the tab of Preload, and enable all the options given below.
- activate preloading
- activate sitemap-based cache preloading
- enable link preloading
- yoast seo xml sitemap
To enable the four options given in the list above, click on the small box and tick mark and then save this setting by clicking on the button below Save Changes.
We have completed the setup of all the necessary settings in WP Rocket Plugin, as soon as you do this you will find that the loading speed and performance of your website has already doubled.
wp rocket plugin free download
here you can free wp rocket nulled, wp rocket free download step by step.
https://www.mediafire.com/file/3u46w4illhhs3gs/wp-rocket.zip/file
Features of WP Rocket v3.9.2 – Caching Plugin for WordPress
- Allows you to Prefetch DNS requests
- Allows you to remove query strings
- Automatically enables recommended settings on installation
- Browser caching support
- Compatible with CDN
- Custom cache lifespan
- Different cache for mobile site
- Easy to configure and setup
- Easy to understand settings
- Files compression support
- Files optimization supports
- Forced cache refresh option
- GZip compressio2
- Helps you to get 95+ Google page speed insights score
- Improve the overall performance of the site
- Integration with Cloudflare
- Lazy images, iFrames, and videos
- No technical knowledge required to use
- Optimization of Google fonts
- Preload URL’s from sitemaps
- Preload cache support
- Preloading of pages
- Reduce the size of the database by optimization
- Works with all type of sites
If you want to see WP Rocket WordPress Plugin Full Setup in video then watch Hindi video given below.
wp rocket – conclusion
There are countless plugins on WordPress to increase the loading speed and performance of our site, but we should not install a lot of plugins because installing too many plugins also affects the loading speed and performance of our site.
WP Rocket is a paid plugin, so it is a free plugin, it works much better, nowadays nothing is available for free, if someone is asking you to give something for free, then you understand that it may cost you more than free. Is.
We hope that with this post WP Rocket WordPress Plugin Full Setup you have completed the full setup of your plugin settings, do you still have any questions? Tell us by commenting below.


